Monday, November 19, 2012

Savory Bites

My kid is a huge fan of Cbeebies channel. She already knows each and every programme and at what time it comes. One after the other she tells about  each and every programme. Like that one day when I was giving her lunch, I saw the programme called “ I can Cook”. In that, you all might know, kids will be cooking easy dishes and my kid loves this programme a lot. I saw this dish which was very easy to make and looks very cute. My little one was asking me how it will taste and all. So I thought of giving it a try and made it with the help of my kid.


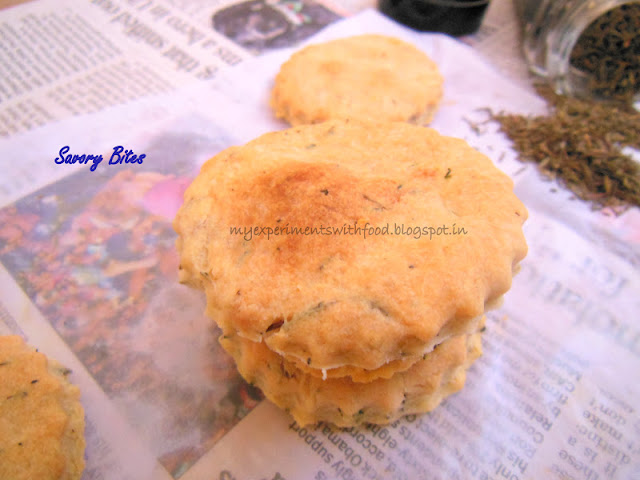
These savory bites are so delicious and are very easy to make. Addition of butter, cheese and milk will make this more healthy and nutritious for kids. The herb used in this is dried thyme, which gives a unique taste and a scintillating aroma to the dish. We can sprinkle some sesame seeds on top while baking, but I like it this way - plain and simple.


Ingredients:

  1. All Purpose Flour / Maida- 100 gms
  2. Butter- 25gms
  3. Milk- 4 tbsp
  4. Cheese- 4 tbsp
  5. Dried Thyme- 2 tbsp
Method:
  1. Mix the flour and butter with your fingers, till the mixture looks crumbly.
  2. In this add the dried thyme and grated cheese, mix well.
  3. Pour milk in the above mixture and knead it well till it becomes a soft ball. (If the dough looks dry we can add little more milk).
  4. With the help of a rolling pin roll out the dough like a chapati but little thick.
  5. Using any shape cutter, cut out shapes and place them on a baking tray.
  6. Preheat the oven to 190 Degrees C and bake it for about 10 - 15 minutes or till golden on top.
  7. Serve them when they are cooled.


Tuesday, November 13, 2012

Badam Burfi / Chocolate Burfi (Chocolate Fudge)- Time to celebrate

Its time to celebrate. It is my blog’s 2nd anniversary and also Diwali. I cannot believe that its been 2 years that I started my small space. Thank you all for your support and encouragement.

The diya was made by my little one at school
Coming to the festival  Diwali, the festival of lights is here and everyone is busy buying crackers, diyas and most importantly sweets. Almost all the sweet stalls are filled with people buying sweets for friends and family.


Since I grew up in Andhra, I enjoy the colours of diwali, lights, crackers and so on. Now as all are busy making sweets, I thought of making some for my little one as she is very fond of sweets and if the sweets are homemade, that will be very natural and healthy.

I have made two varieties of burfis. One is almond and the other one is chocolate burfi. I only had plan of making almond burfi, but as I was going through my old cookery book, I came across this chocolate fudge which is very easy to make and can be made within minutes with few ingredients.


I love cooking and mostly baking. But when it comes to making sweets, I am a bit behind. My Mom used to make Kerala cuisine, but she used to try and make whatever we asked for. After I came back from school, she used to give me surprises by preparing all these. So I tried these and both the burfis came out quite well.

For badam burfi:
Ingredients:

  1. Almonds- 1Cup
  2. Sugar- ¾ Cup
  3. Milk- ¼ Cup
  4. Cardamom Powder- ½ tsp
Method:
  1. Soak almonds in hot water for about 20- 30 min. Peel the skin and grind it to a fine paste by adding required amount of milk and keep it aside.
  2. Add sugar and grind it along with almonds.
  3. Heat a nonstick pan and pour the almond mixture and stir well till it separates from the sides of the pan. In this add the cardamom powder and mix well.
  4. Pour this in a greased pan and smoothen the surface with a spoon. Keep this aside till it sets well. Cut them into squares and serve.
Chocolate Burfi:
Ingredients:
  1. Milkmade / Condensed milk- 200gms
  2. Butter- ¼ Cup
  3. Cocoa Powder- 3tbsp
Method:
  1. Mix the condensed milk and butter without any lumps and heat it in a pan for about 10 -15 min or till it becomes brown in colour.
  2. Add the cocoa powder and mix well.
  3. Pour this in a greased pan and keep this aside to set. Cut it into squares.


Wednesday, November 7, 2012

Leftover Upma Cutlet

On some days, I will be left out with more breakfast. How much ever we try to finish it off little bit will be remaining. Like this upma was left out as I made a lot and we are not big  fans of upma ;-). So instead of wasting the left over upma, I wanted to try something different and thought of making a snack out of it, so that my little one can munch them.


Before this I never saw or tasted a cutlet with upma. But when I searched around, I stumbled upon these pretty looking cutlets from Shanthi’s blog 7aum suvai. I tried these cutlets and they were extremely tasty and a perfect evening snack. I didn’t add vegetables while preparing upma, I added them while preparing cutlets and shallow fried these using very little oil. A yummy and tasty snack was ready within minutes.


If anyone gets bored of eating leftover upma or feel guilty about wasting it, they you can try this and enjoy :-)

Ingredients:

  1. Leftover Upma- 1 cup
  2. Carrot (diced)- 1 no
  3. Beans (chopped)- 4 nos
  4. Corn flour- 1/4 cup
  5. Bread crumbs- 1/4 cup
  6. Salt- as per taste
Method:
  1. Boil the carrot and beans with little salt and add to the left over upma and mix well. ( if you add vegetables while making the upma, then skip this step).
  2. Make small balls out of the upma and flat it on your palm. Keep this aside.
  3. Mix corn flour with little water and keep this batter aside. In another bowl take bread crumbs.
  4. Dip the above shaped upma first in the corn flour batter and then in the breadcrumbs and shallow fry them till it becomes golden brown on both the sides.


Related Posts Plugin for WordPress, Blogger...